
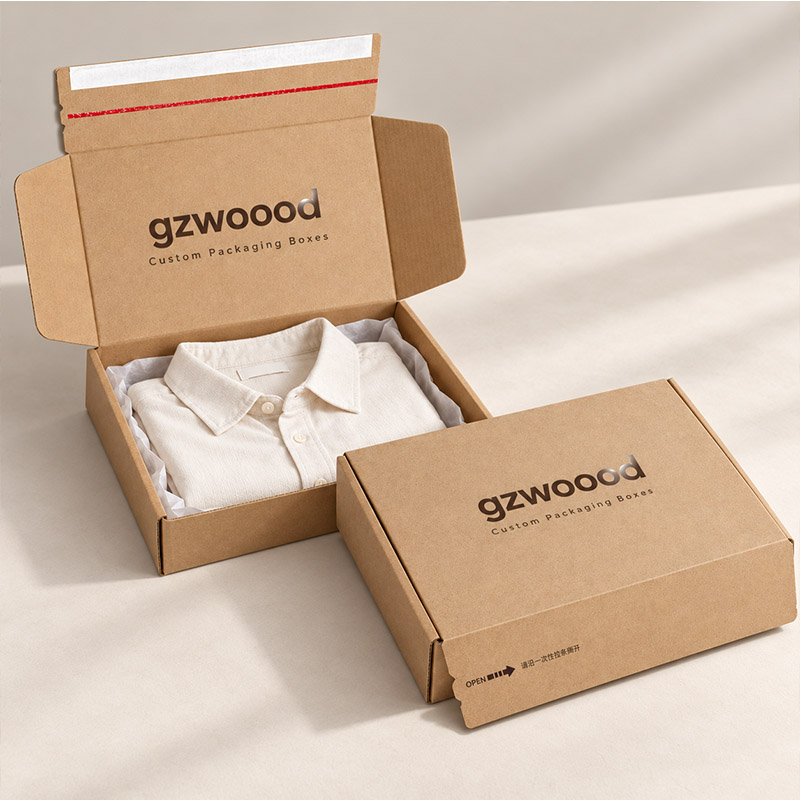
A shirt can leave your packing table neatly folded and still arrive looking untidy. Too much room lets it move around. Too little depth presses down the collar. And a lid covered in packing tape can spoil an otherwise carefully designed box.
For clothing brands, these small details deserve as much attention as the printed logo.
An apparel shipping box with a tear strip is one option worth considering. The self-adhesive flap seals the box, and a pull strip gives the customer a straightforward way to open it. It suits a simple kraft design just as well as a fully printed mailer, provided the size and construction are right for the garment.
A box can include either feature or both. Specify “tear strip and self-adhesive closure” when requesting a quotation.
The “zipper” is an opening strip
You may see this packaging described as a zipper box, a tear strip mailer or a peel-and-seal shipping box. The terms overlap, but they refer to different features.
The tear strip opens the box. The peel-and-seal adhesive closes it. For the style shown here, “corrugated apparel mailer with a tear strip and self-adhesive closure” is a clear starting brief. The strip is pulled away once; it does not close again like a zip.
Start with the folded garment
Before choosing box dimensions, fold and wrap the clothing exactly as you plan to send it. Include the tissue paper, care card and any accessories, then measure the complete pack.
A folded T-shirt and a structured shirt may have a similar footprint but need different amounts of space above them. Knitwear adds another variable: pressing it into a shallow box may make packing awkward and leave the lid under pressure.
Check the fit with the actual garment before approving the size. Place it in a plain sample, close the lid and open it again. Does the collar still sit properly? Has the tissue caught in the closure? Can a packer load the garment easily without pushing it down?
Also confirm whether the quoted dimensions are internal or external. Internal dimensions tell you what fits. External dimensions tell your courier how large the parcel is.
Pay attention to box depth
For lightweight clothing, unused space can cost more than expected. A box that looks only slightly deeper may have a noticeably larger shipping volume.
Example: A 35 × 28 × 8 cm parcel has 25% more volume than the same box at 6 cm deep. Using the DHL Express dimensional-weight formula of length × width × height divided by 5,000, the calculated weight changes from about 1.57 kg to 1.18 kg.
This is an illustration, not a freight quotation. The final charge depends on the service, actual weight and billing bands. Still, it shows why checking the depth is worthwhile before ordering a production run.
Leave enough room to protect the garment and pack it comfortably. Then remove space that serves no useful purpose.
Keep the design simple where it matters
For a kraft apparel mailer, a well-placed logo and neatly wrapped garment can carry the presentation. The open lid offers room for a brief message, but it does not need to become another advertising panel.
Brown kraft has its own colour and texture, which will affect printed colours. If your design depends on a bright white background or precise colour reproduction, discuss a white liner or printed paper facing with the supplier. Check the result on the chosen material rather than relying only on a screen mockup.
Foil and Spot UV can add detail, but their suitability depends on the paper surface and production method. Leave practical space for the shipping label, keep essential artwork away from the tear path and make “Pull to open” easy to find.
Try the closure yourself
The adhesive and tear strip are small parts of the box, but they affect every order you send.
During sampling, assemble several boxes and seal them as your packing team would. Check that the flap sits flat and bonds properly to the selected surface. Then try the opening strip. It should be easy to grip and pull through without leaving the customer struggling with a half-open lid.
For a box intended to travel directly through a courier network, the board and closure need to suit the packed weight and delivery conditions. A tidy appearance on the desk is only part of the approval.
Plan for returns before finalizing the structure
If customers may return clothing in the same box, include that requirement in the first brief.
A second adhesive strip can provide a fresh seal for the return journey, but the box must retain enough undamaged material after the first opening. Adding another strip to an unsuitable flap will not solve the problem.
Test the whole sequence: pack, seal, open, repack and seal again. If the design requires the customer to add tape, make that clear in the return instructions.
Ask what goes into the finished box
Kraft paper gives the packaging a natural appearance, but colour alone tells you little about its recyclability. The tear strip, adhesive, coatings and any plastic lamination all need to be considered, along with local collection rules.
If recyclability is a priority, discuss it before selecting finishes. It is easier to choose suitable materials at the start than to change them after approving the artwork.
Planning a custom apparel mailer?
We can review the box size, corrugated material, printing and closure options around your clothing and packing requirements. Send a photo of the garment as it will be packed, its folded dimensions, total weight, order quantity and delivery destination. Let us know whether you need a return closure, too.
View our custom apparel shipping boxes or contact our team to discuss your project.